Monday, 29 June 2015

Coldplay Lip-Sync Video attempt


Above we can see the video attempt me and two of my group members had at lip-syncing. We have chosen the song Coldplay - Sky Full Of Stars as the base song and used one of the group members as the person who will lip-sync whereas the cameraman role was split between me and Magdalena Zygmunt. The songs itself has a very long intro with the beat slowly fading into the chorus therefore we have chosen to use this in order to portray our editing skills by cutting the shots to the beat of the song. As a result the scenery interacts with the music making it more interactive and more attractive for the audience. During filming we came up with the idea to go against the performance based music videos and wanted to show other shots such as the scenery. This allowed us to experiment with camera features such as zooming, focusing or even experimenting with various angles. During post-production we as a group have chosen to go with the black and white effect throughout the whole video as by this we believe it emphasises the sentimental lyrics which is in the music video.

By this being our first attempt at creating such a music clip,  I have found some errors which could be corrected and then looked for in our final music video production in order to make it of a high quality. In this clip we could of used a faster paced cuts when the song speeds up in order to make the visual side of the music video reflect the sound. By this the clip would of been much more effective by the successful cutting to beat.
Tuesday, 23 June 2015

Introduction to lip-sync

In today's lesson we were introduced to lip-syncing. Lip-syncing is when a artist or an actor moves his/hers lips silently in synchronization with a pre-recorded soundtrack. For us to practice lip-syncing we were placed in groups, told to pick a song of our choice, print out the lyrics and practice shooting a lip-synced video. Our group has chosen the song 'Coldplay - Sky Full Of Stars' which we put forward for lip-syncing. I believe that this exercise was very beneficial for our group as we were allowed to practice syncing with the track as well as choosing the right environment and cinematography.

To shoot our lip-sync video we have chosen an outdoor location, in the park next to our school. As a result of this we were provided with a sufficient lighting on our actor which allowed for clear focus. Additionally by us choosing an outdoor location to shoot the video we were allowed to refer to the songs title 'Sky Full Of Stars' by shooting the sky which we then will implement into the lip-sync video. I believe that the right setting in a video is essential as it should reflect the songs mood as well as refer to its lyrics, therefore I believe that we were quite successful as selecting the right location.

Another key are which we had paid a lot of attention to was the actors body language. While shooting our lip-sync we have chosen to use a close-up to present half of the persons face, focusing on his lips. The song which we have chosen to lip-sync includes a hybrid of both quite and loud singing therefore we had to make sure that our video reflects this very well. To do so we have at first tested out the actors ability to reflect the tone of the voice in the song by playing the music via a phone and seeing how it looks on camera without recording. When we have pointed out any areas to improve and checked that the actor is lip-syncing correctly, we have then moved on to recording it on camera.

After successfully recording the needed shots we have moved our footage onto the computer which we then would use for editing using Adobe Premier. Next lesson we will begin editing the footage together and adding the song in order to come up with a perfect lip-sync video. I am looking forward to the next lesson as I would again be allowed to challenge myself and learn something new from the Adobe Premier software, improving my skills at creating a lip-synced video.

-> Click Here To Listen To Coldplay - Sky Full Of Stars <-

Wednesday, 17 June 2015

Introduction to videos


In today's lesson we had a go at completing our own interpretation of Western Shootout movies. We have successfully recorded multiple shots and then assembled them into a single movie. While filming and editing I have taught myself many areas to look out for such as the editing and cinematography. I have found today's task very useful as I had a chance to experiment with Adobe Premier which I have never used before.


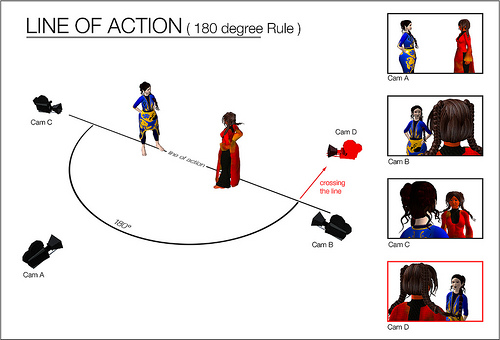
First of all I have tried to implement as many cinematography techniques which I have found in a Western Shootout movie into my own movie. Therefore I have used tracking shots, medium two shots, establishing shot, wide shot and POV shot. These shots do follow the codes & conventions of Western Shootout movies however a shot such as POV does not. I have implemented this by purpose as I believe that it does emphasise the tension visible in the scene, showing the characters point of view of the other bad character that she is about to face. While editing I have found a error which I have performed during my filming, which was that I have not followed the 180 degree rule. 180 degree rule is a imaginary line which we cannot cross when filming characters who are facing each other. As a result of not following this rule, the characters do not seem as if they are facing each other. By this error I have taught myself that it is essential to use the 180 degree rule while filming which could really affect my further music video task. Additionally another error which I have performed was for me to capture the establishing shot in a still position. By this the establishing shot being very still I have made it very dull. To fix this I could of used a pan in order to show more of the scene as well as capture the audiences attention.


To transition between scenes I have used very simple cuts which do follow the codes and conventions of western shootout movies. By the use of cuts I was allowed for quick transition which in fact did emphasise the tension between both characters. Additionally I could use a fast paced or slow paced cuts in order to emphasise the tension as by this the audience would feel it build up by the use of fast paced cuts, and for it to drop using slower paced cuts.

While filming, I have decided to film longer sections of each shot which then I would of cut using Adobe Premier which I have used. As a result of this I could choose which section of the filmed shot I wanted to use. This allowed me to refine and select the best sections of the shots.

Monday, 15 June 2015

Introduction to blog

I introduce you to my A2 Media blog where I will be frequently posting my journey throughout the school year, showing the journey of me researching, planning and constructing the music video.

Throughout the year I will be working in a group which consists of three people including myself (Candidate Number: 1494), Magdalena Zygmunt (Candidate Number: 1504) and Ernest Staszak (Candidate Number: 1036).

Hope you enjoy looking at my blog!